This post is a collection of notes for use when I build the house. It will be edited and added to as I work on the workshop frame.
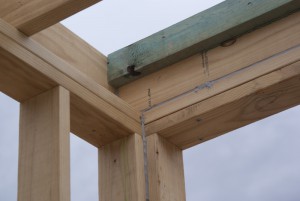
Double top plates
I decided to use double top plates for two reasons:
- where walls intersect you can overlap the top plates for a good connection between the walls
- It means I don’t have to worry about lining up the ceiling joists exactly with a stud.
You need to factor in the second top plate into the wall height.
Install the upper top plate once the walls are erected so you can overlap the plates onto the adjoining wall.
Wall height & steel beam height.
I wanted 9 foot ceilings as the finished floor to ceiling height. In order to achieve that, the following factors need to be accounted for:
- 20mm for floor battening
- 20mm for timber flooring
- 10mm for ceiling plaster
- 20mm for ceiling battens – I have decided to use steel/tin ceiling battens to level out the ceiling.
So, thats 70mm extra on top of the 2700 ceiling height. Now, thats easy to do – it means a stud length of (2770 – 3*35) = 2665. The trap however is that the bracing ply is 2740, not 2770. I am not sure it matters if the bracing ply does not reach to the upper top plate. The bracing from the first floor can be made to reach down to met the ground floor bracing. I guess I’ll find out when the inspector arrives.
This height of 2770 also governs the height of the steel beam. The bottom of the 290mm bearers needs to be 15mm below the bottom of the steel beam to allow for timber shrinkage. So, the bottom of the steel beam is 2770 – 290 + 15 = 2495 off the concrete.
Unfortunately the double top plates were decided after the steel beam for the workshop was in place, and after the decision to use ceiling batters. However, it seems to have worked out OK so for I think. Need to be a bit more careful with the house.
Double bottom plates
The advantages of using two bottom plates (for the ground floor) are:
Lay the first plate for ALL the walls, and get it all dead level with packers. Use concrete nails here. Then, all walls can be made to exactly the same heights irrespective of slab levels.
Because the flooring will be battened, single bottom plates will not leave any nailing room along the bottom of the wall because the flooring will be higher than the bottom plate. This is negated however by blocking along the base of the wall (see below).
I am still undecided about double bottom plates. It would mean significantly longer dyna bolts, but thats not an issue.
Blocking at wall base for skirting nailers
Based on Sam’s advice I decided to fit extra blocking at the base of all the walls to give me good nailing surfaces for skirting. As I plan to fit high (150mm) skirting, that is possibly multi part, this will be a great advantage for a minimal cost.
Just remember that when the wall is laying down on the slab being made to put the blocking on the correct side. Also, for internal walls, the blocking goes on both sides.
Strap bracing
Where a wall needs strap bracing, fir the bracing to the second last stud at each end, NOT the last stud, so you can wrap the bracing under the top/bottom plate and nail it on. Make sure the bracing is fixed at a stud, not between studs, otherwise the tension will buckle the top/bottom plates.
All walls that do not have a door or window in them will be braced with straps, irrespective of whether they are needed structurally or not. It helps to keep everything square.
Noggin spacing
Noggings are supposed to be spaced at a max of 1350 o/c. If the studs are 2665, as indicated above, thats OK. Because of the blocking at the base of the walls, put the noggins half way between the top of the blocking and the top plate (because the blocking is effectively a nogging also.
Drill a 25mm hole/slot in every hogging at the middle of one end to allow wiring to be fed down. Use the mortiser – its easier and neater than drilling afterwards.
Lintels and window/door heights
We want all the window and door tops to be 2400 – i.e. 300 from the ceiling. The lintels are 240mm. Double top plates are 70mm. So, the window/door tops (not including the frames and any packing, will be 310mm from the bottom of the ceiling joists.
Thats OK. Factor in 10mm plaster, 20mm battens and the lintel bottoms are 280mm from the finished ceiling plaster. Then factor in 20mm frames and a 10mm packing gap, and the glass or door top will be 310mm from the finished ceiling, which is great.
So, put the lintels at the top of the walls, directly below the lower bottom plate, with no cripple studs, and we are good.
Jack studs
I made the jacks out of 120 x 35 LVL, instead of solid pine. Seemed like a good idea as the LVL’s are rated at F17.
Stud width
I’m using 120mm studs instead of 90mm. Lets me cram more insulation in – I plan on using R2.5 wool and polyester blend insulation (65% wool). These have a loft requirement of 120mm.
The other benefit of 120mm studs is more nailing surface on the ends, so less splitting of the timber when end nailing.
Frame sealing
I am trying to build an airtight house (then ventilating with a heat recovery ventilation system). So, EVERY relevant joint is sealed with polyurethane sealant.
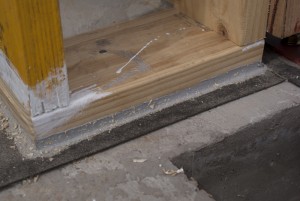
Both sides of the bottom plates are sealed to the slab. Note, DO NOT seal the fram to the melthoid, as shown below. It just doesnt stick very well because of the sand in the melthoid. So, trim the melthoid back to the edge of the frame, and seal the frame to the concrete, encapsulating the melthoid. The polyurethane sticks well to the concrete.
Bracing ply
There will be bracing ply on every section of the walls, even if it is not needed structurally. The bracing ply will be sealed onto the frame and is one of the main air tight mechanisms.
Where the bracing ply is structural, and the width of the bracing span is greater than 1200mm, I need to provide 45mm studs to but join the embracing ply on. Using 1200mm sheets here is a pita, as 1200 does not sit well with 450mm o/c studs. So, it might be better to really plan out the bracing (on the Blender cad plan) and get some 900mm sheets for these sections. Then just insert a 45mm stud in place of a 35mm stud. Need to check if 120 x 45 studs are available.
On the workshop, because the walls are already cross braces with strapping, I think I will just trim the ply and use blocking against a stud as extra nailing space. It messes around with the wall insulation, but thats just too bad.
Ceiling joist blocking
Blocking of joists is only required every second or third joist I think. However without blocking between every joist its impossible to make the building air tight. Ordering 3.3m joists meant that the extra length was cut for the blocking. However, I think I need to get 3.6m joists for the house. The workshop was a little poorly measured out, and its actually a fraction smaller than it should be. That means the spans are only about 2.9, when they should be 3.0, so in the house I will need 3.1m actual joist length (to span 3.0) so I will need 3.6m joists to cut the blocking.
Post layout and installation
This is a big issue, and proved to be a real pain. It was very hard to ensure the posts were in exactly the right position, not twisted, and vertical.
See here for a discussion of making and installing the posts.
Exterior wall position
Because I am adding 50mm of expanded polystyrene foam to the outside of the frame, the walls need to be inset 50mm so there is still an air gap between the brickwork and the foam. This has an impact on the slab size – it needs to be 100mm bigger north/south and east/west.


amazing work.
i liked the stuff posted here. wishing you best of luck for your future.
@Dena, @Bernardina: thanks for the comments. Hope you find something useful in here.